Shift Nodes
Nodes are the graphic units that build up the workflow. Each node is associated with an operator, which defines the execution logic of the node and is connected to other nodes through plugs.
Node Interface
Five main interface elements compose the node: the node's name, the operator type, the trigger plugs, the input and output plugs, and the progress bar.
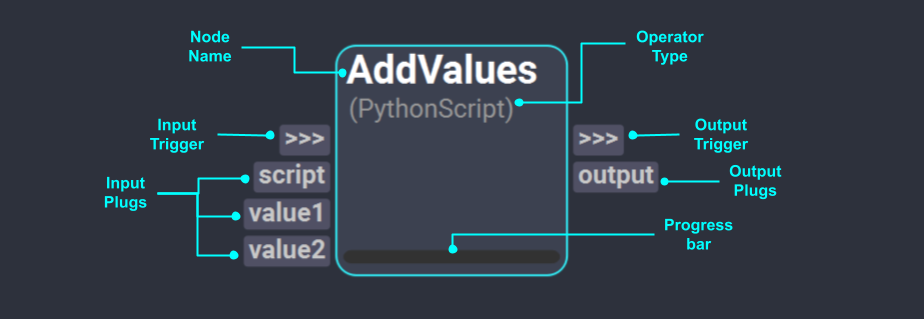
- Node Name: Defines the name of the node. On creation, the name of the node is the name of the operator with an enumerated suffix. The name of the node can be changed through the Inspector Widget.
- Operator Type: The associated operator to the node. It determines the native plugs of the node.
-
Trigger Plugs: The trigger plugs (
>>>) are plugs meant to define the node's position in the execution graph. They do not pass any data. If the node has other input or output plugs connected to another node, the trigger plugs do not need to be connected; otherwise, it is recommended to connect these plugs to indicate when the node needs to get computed. - Input and Output Plugs: Input and output plugs define the incoming data required by the operator and the resulting data after it is computed.
- Progress bar: A visual indicator of the percentage of the node's execution that is complete.
Inspect a Node
To read further information about a node, Right-Click on the node and Click on the Help option. This will prompt a dialog with the following information:
- The node's name.
- The operator type and the Catalog it belongs to.
- The operator description.
- The input and output plugs with their corresponding plug types.

Plugs
Plugs define the input and output data of the nodes. Data values can be set through the Inspector Widget or by connecting plugs, which allows nodes to pass data from one to another. The kind of data compatible with a plug is defined by the plug type.
Plug Types
| Type | Description | Compatible Python Type |
|---|---|---|
| Bool | Defines a plug capable of carrying a boolean. | Bool |
| Code | Defines a plug capable of interpreting a Python code block. This type is used whenever custom scripting is required in a node. A plug of this type displays as an embedded text editor in the inspector. | String |
| Color | Defines a plug capable of interpreting a color in RGBA. Interacting with a plug of this type opens a color picker dialog. | List |
| Dict | Defines a plug capable of carrying a dictionary. | Dict |
| Dir | Defines a plug containing the path to a directory path. Interacting with a plug of this type in the inspector opens a directory browser dialog. | String |
| Enumerator | Defines plug capable of carrying a list of selectable values. It is not possible to create custom Enumerator plugs in a node. | String |
| FileIn | Defines a plug containing the path to an input file. This type is used for open and import operations. Interacting with a plug of this type in the inspector opens a file browser dialog to select an existing file. | String |
| FileOut | Defines a plug containing the path to an output file. This type is used for save and export operations. Interacting with a plug of this type in the inspector opens a file browser dialog. If an existing file is selected, it will be replaced after the workflow executes. Alternatively, a non-existent file can be entered to create a new file. | String |
| Float | Defines a plug capable of carrying a float. | Float |
| Instance | Defines a plug capable of carrying an object instance. These plugs can be differentiated by their dotted outline. | Any |
| Int | Defines a plug capable of carrying an integer. | Int |
| List | Defines a plug capable of carrying a list. | List |
| Object | Defines a plug capable of carrying a generic Python object. | Any |
| String | Defines a plug capable of carrying a string. | String |
| Trigger | Defines the node's position in the execution graph based on the connected nodes. | - |
Inspect a Plug
To read further information about an existing plug in a node, Right-Click on the plug and Click on the Show option. This will prompt a dialog with the following information:
- The plug type.
- The plug value python type.
- The plug current value.
- The plug default value.
Alternatively, this information can also be accessed by doing Right-Click on the associated widget for the plug in the inspector widget and Click on the Show option.
Rename a Plug
In some nodes it is possible to set a nice name to a plug. Usually, when creating a plug, the unique code name of the plug corresponds to the plug's nice name. To change the nice name, Right-Click on the node's plug and Click on the Rename Plug option if available. This will prompt a text box where a new name can be set.
Reorder Plugs
All plugs, except for trigger plugs, can be reordered within a node. To reorder plugs, Right-Click on the node and Click on the Reorder Plugs option. This will prompt a dialog with two lists, one for input plugs and another for output plugs. Drag and drop the plugs around their corresponding list until they are in the desired order. Finally, Click on Apply or Accept to set the new plug order in the node.